How to Tie a Chair Sash Bow
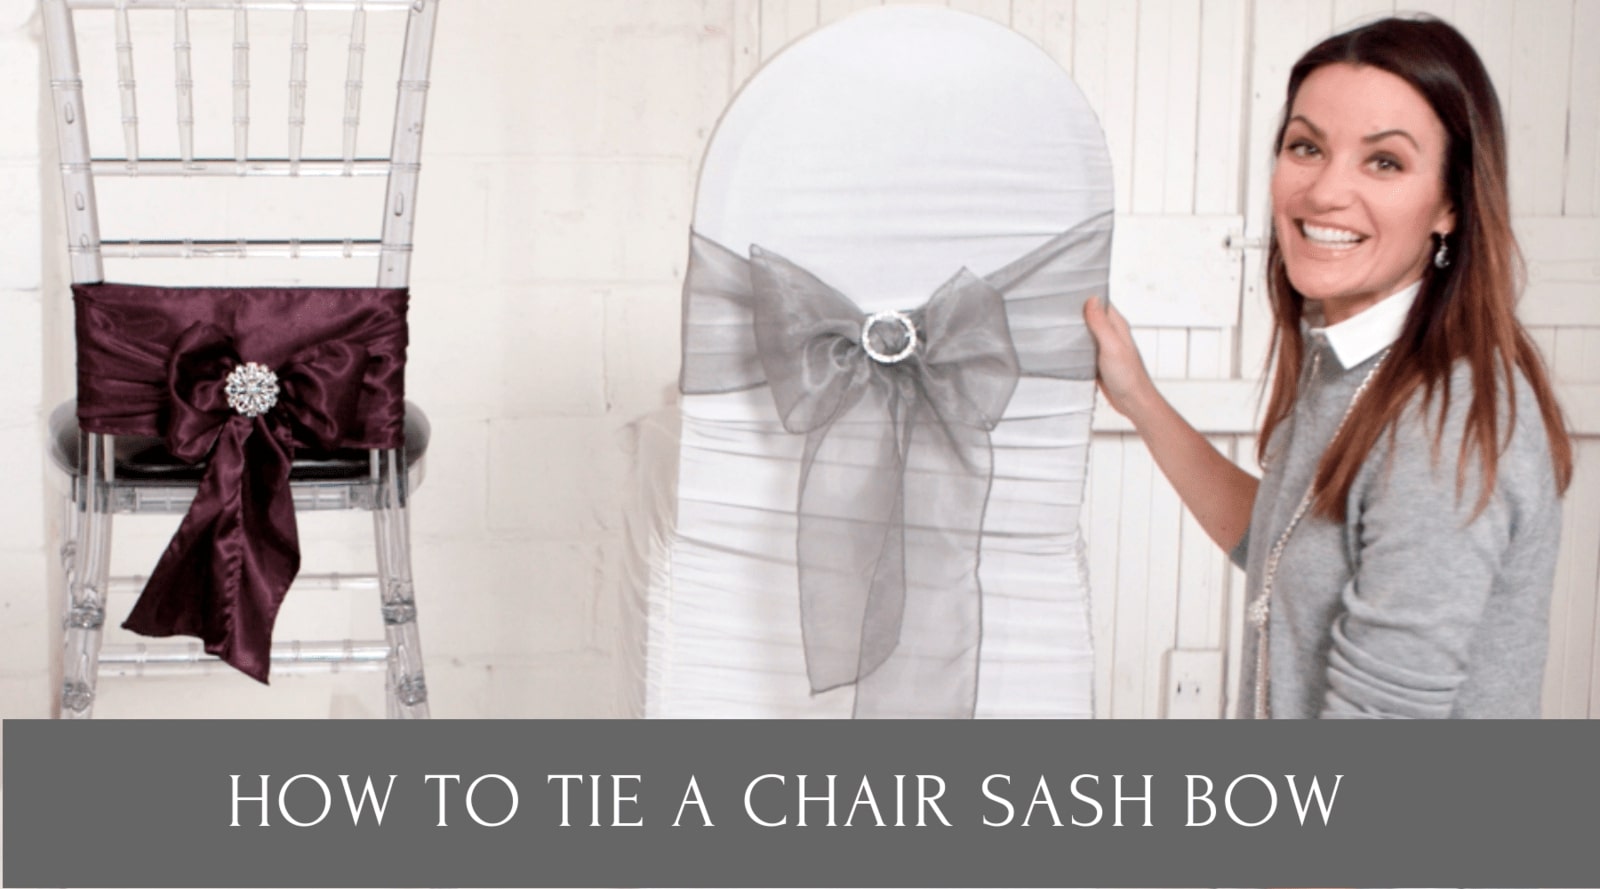

Learn how to quickly tie a beautiful chair sash bow to decorate your event chairs
I've got a gorgeous, effortless, and elegant wedding and event DIY to share with you. This easy no mess, no fuss DIY looks so beautiful on the chairs and can transform an event space in a matter of minutes.
Adding decor to your chairs is a great way of adding a special touch to the overall design of your wedding but I know that it can be both costly and time-consuming to consider this option. As is our long-standing tradition at Totally Dazzled, I'm always looking for easier ways to add beautiful details that fit in with your budget and will save you time as well. In this tutorial, I walk you through a simple chair sash bow using satin or organza fabric and a Rhinestone brooch or buckle embellishment. Here's another tutorial where I walk through how to make tulle bows for chairs as well.
How to Tie Chair Sash Video
In order to make the chair sash bow, you'll need:
- a length of fabric or organza
- Your choice of Totally Dazzled Rhinestone Brooches or Rhinestone Buckles.
As there is no need to cut, glue or sew, this really couldn't be easier than simply tying your bow and adding your statement bling piece. In the video, I show you how to create two looks and how to add slight variations that can change how these two looks feel in the end.
Short-Tailed Bow with Chair Sash
I've used a chivari chair to demonstrate the short-tailed bow look today. remember that you can make use of any kind of chair that you'd like, these bows would still look as glamorous.
- Start by measuring a good length of fabric. Once you have your desired length, wrap the fabric around the chair starting from the back of the chair. (You'll be wrapping your length around the front and back to the back of the chair).
- Tie a basic knot and start by creating the bow. You can tie your bow in whichever way feels comfortable for you, I've shown in the video how to achieve that pretty puffy look.
- Fluff the bow out and add your statement brooch or slider buckle. For the tutorial, I've used our very popular Antique Rhinestone Brooch.
It's worth noting that it's not necessary to cut a long piece of fabric for this look. If you'd prefer to save even more on the fabric, simply cut your piece long enough to wrap around only once, starting from the front of the chair to the back. See the tutorial on creating the long tailed bow for this.
Creating a Long Tailed Bow With Chair Sash
For this look, I've used a white banquet chair. Swap out the colors for a different feel as you see fit.
- Follow the same steps as before, simply changing the number of times you fold the fabric around the chair so that your tails will be long.
- I've used a slider buckle here so that you can see how to integrate this into your look. This is done before tying the bow and after tying the knot. Simply tie your knot and weave the buckle onto your fabric with the dazzling side showing up. Sliding it all the way to the top, create your bow. I've taken careful steps to show you how to do this in the video in order to get that slider buckle sitting at the top of the bow just like we want it.
- I've used a Silver Rhinestone Buckle Slide for this project as it's absolutely stunning. One of my favorites for chair sashes.
Quick Ideas
- It's super easy to change up the looks for these DIYs and as there is no glue or sewing involved, you can play around as much as you like with the position of the bow on the chair.
- Using thinner or thicker widths for your fabric or organza will give you a vastly different look.
- Even though organza, silk and satin are often seen on event and wedding chairs, there's nothing stopping you from being totally creative. Use burlap or lace for a rustic themed wedding with a pretty and understated bling piece. How about a striking floral fabric for those bohemian or floral print weddings that are hitting the trends?
This is really one of those Wedding DIYs that you can have a whole lot of fun with. Enjoy every minute of planning and decorating. Looking forward to seeing your projects on Instagram - use #totallydazzled so that we can take a look too.
Check our blog for more chair sash ideas and tutorials.
Shop the Rhinestone Products we used in the making of this chair sash