DIY Elegant Chair Sash
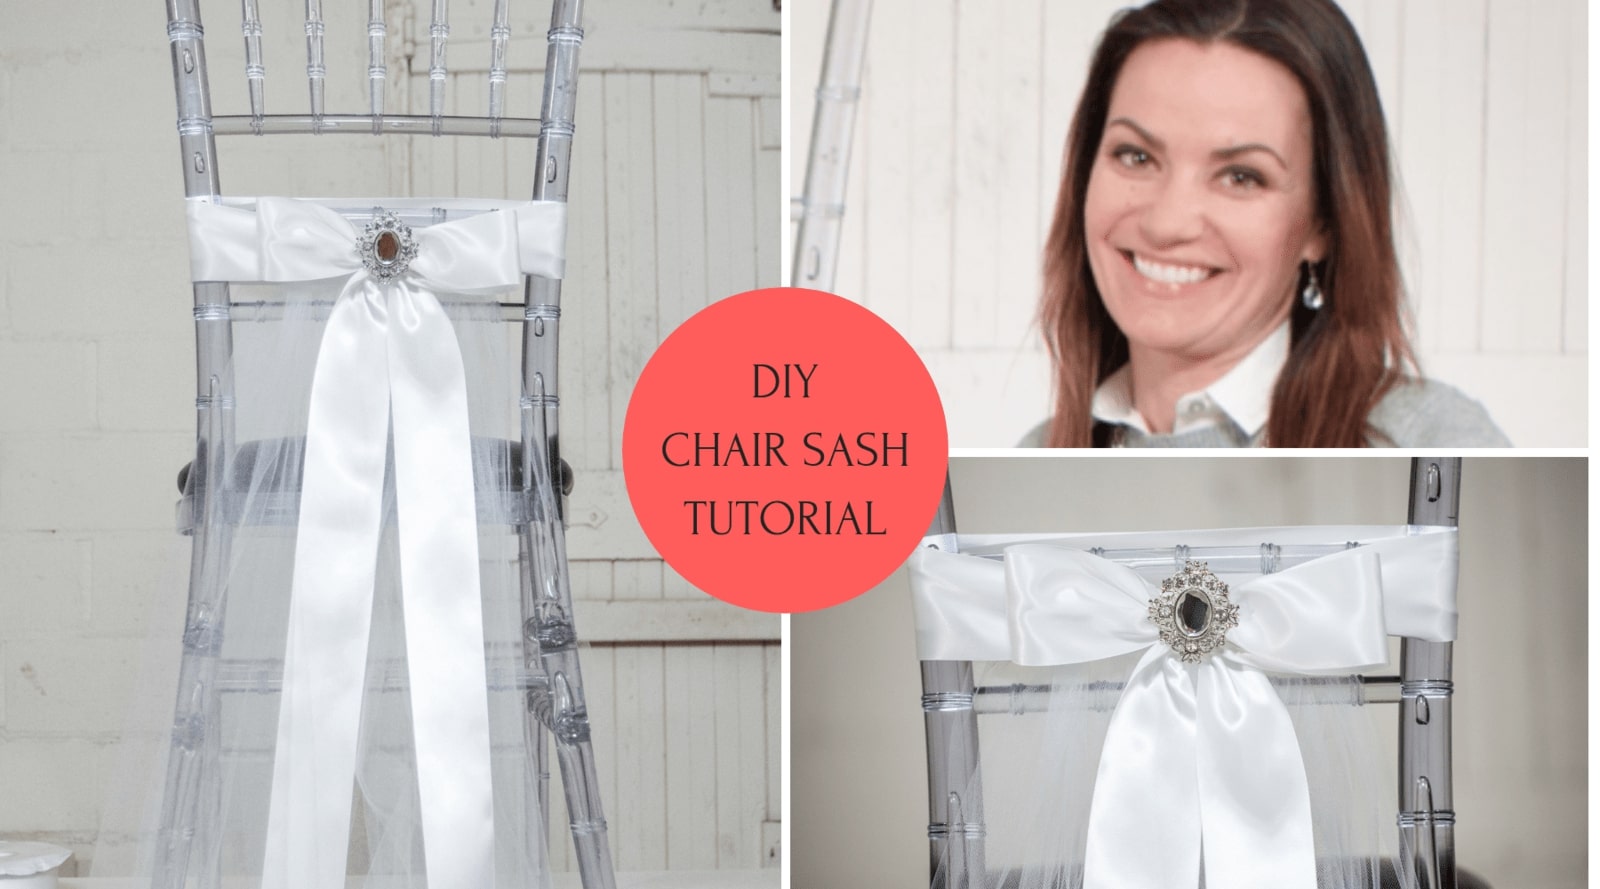

Make your own Tulle skirt chair sash
I'm really excited to share one of my favorite DIY tutorials with you. This DIY takes inspiration from the hot wedding trend of tulle skirts and adapts that trend to suit the back of a chair. It looks gorgeous, elegant and is unbelievably simple to make, requiring only a few items and little to no effort.
If you are only making these for the brides and grooms chairs then you could easily do this as a day before diy. It's that simple to put together and as it's a no mess-no fuss DIY, you could even set it up when you set up the venue.
Watch the tutorial
In order to make the DIY tulle skirt chair bow you'll need:
- a length of ribbon (I've used a 2" wide white ribbon)
- A length of tulle ribbon (I've used a 6" wide white tulle)
- Your choice of bling brooch
- A pair of scissors
Kicking this tutorial off, start by measuring your length of ribbon. The best way to do this is to simply measure it against the chair that you'll be using in your event or wedding. Once you've decided on the length, tie the ribbon to the back of the chair in preparation for the next step. Measuring and cutting the tulle is simply a matter of folding a length of tulle in half (prior to cutting it) and measuring it against the back of the chair from the ribbon. You'll be tying the tulle to the ribbon, so be sure to leave a little extra to cater for that tie.
You could decide how heavy and how thick you'd like to make your tulle chair skirt, I've used between 6 and 8 tulle lengths in order to fan the skirt out evenly. Once you've tied all the lengths of tulle to the back of your chair, you'll need to create a bow with your ribbon to cover the knots of the tulle. Add the final touch, a bling brooch, and you're all done!
That's it, it's that simple.
Quick Ideas
- You can create different looks by simply using different widths of the main ribbon used to create the bow.
- While I used white to suit the look I was going for in this video, remember that any color combination and color tulle that you feel is best will work too, so get creative with your colors.
- I used the gorgeous crystal buckle slide for this project but you could use any brooch that suits your needs. A brooch is easy to use as it doesn't require any glue in order to attach to the ribbon. However, you could also make use of a flat back and glue the piece on with a strong glue like E6000. If you really wanted to get crafty, you could even sew a rhinestone button on as you bling piece. It's all up to you to style your tulle skirt chair bows the way that you like best.
As with all of our DIYs, I encourage you to simply have fun. Enjoy every moment of the crafting process. If you're DIYing it up for your wedding, be sure to plan ahead so that last minute blunders or unforeseen circumstances can be avoided. Even though this DIY is easy, if you're planning on making a large number of these, it's always a great idea to be prepared for the just in case something doesn't go according to plan.
Shop the Rhinestone Products we used in the making of this chair sash
Take a look at our Lookbook 2016 Pinterest Board